Tuesday, March 20, 2012
no image

Check Your Battery Performance With “Badass Battery Monitor”

apps
In the recent times there are not many new smartphones that offer a good battery life. Usually when a smartphone is cut off from the charger in the morning, it is usually unable to make it through the night to be useable the next work day. So, we are in need of a new revolution in battery technology, but at this time we have to try hard to conserve as much battery life as possible and we have to do that without losing features that make our smartphone smart.
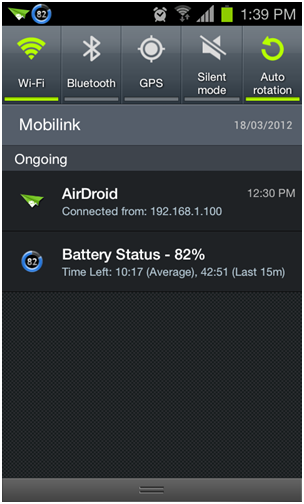
So, we present to you a new app called Badass Battery Monitor. It is a new app and we have found it very useful as it displays all those apps that are responsible for unnecessarily draining of battery life, so you can prevent them from doing so. Take a look here.
android apps
Features
Badass Battery Monitor so many handy features including detailed display of the apps that are using your battery, it also appears in the status bar notification to display the battery state and time left estimates. There are many other features like widgets, the ability to share battery stats and others but the most attractive feature of this app is its ability to tell which apps keep your device in a wakelock.
Which Apps Keep Running in Background?
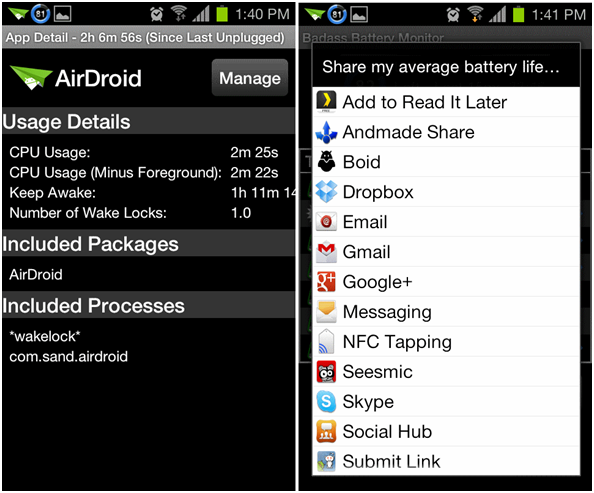
If you are not familiar with the term, Wakelock is a state when your phone’s display is off but still there are apps running in background and using resources. Well, these apps running in background are mainly responsible of the battery drain and it is very important that you should know which apps are those. Here take a look at the screenshot below, it shows how this wakelock feature works. You will have to tap App Usage and then select any app you want to see, if it says wakelock then you have definitely caught that app:
android apps
After testing this app we have found out that Facebook for Android app is responsible for about 10% to 15% of battery life used by apps, so, now whenever I am done using that app, it is exited manually.
There are two versions of the app available right now; one is a free while the other one is Pro version which is optimized for tablets and other large screen devices.
Saturday, March 10, 2012
no image

Root the Samsung Captivate I897


Are you itching to gain root access on your Samsung Captivate? If you’ve recently updated to Android 2.3.3 Gingerbread UCKF1 firmware, rooting your Samsung Captivate is no problem at all. XDA Developers forum member designgears brings us an easy kernel-based solution. The kernel may be rather basic but it gives you root access with init.d support. The kernel is also insecure, hence running adb as root.
If you’re new to the world of rooting, have no fear. Though it may not be a one-click solution, even the most inexperienced of Android users can make this work as long as you’ve got Odin. Just follow our instructions and you’ll be set.

Caution

It’s important to note that this rooting procedure will work only for the Samsung Captivate I897. It will not work on the Samsung Captivate Glide or other phone models so please do not attempt to use this method to root incompatible phones.
Also, we take no responsibility over any damage or disaster that occurs to you or your phone because of your use of this guide. Use the information at your own risk.

Requirements

If you’re excited to gain root access to your Samsung Captivate, you’re going to need a few things:
  • Samsung Captivate with Android 2.3.3 Gingerbread UCKF1 firmware
  • A computer running Windows
  • Make sure that your Samsung Captivate’s battery is fully charged. This prevents the phone from shutting off in the middle of the rooting process.
  • Back up any important data on your phone, just in case data will be lost or corrupted during the rooting process.
  • Make sure that USB Debugging has been enabled on your Samsung Captivate. You can do this through “Settings > Application > Development.” Make sure that USB Debugging has been checked.
  • Samsung USB drivers installed. Download USB drivers for 32-bit Windows or 64-bit Windows
  • I897UCKF1 – Auto root kernel
  • Odin3 v1.8.5 — Get it here.

Instructions

Once you have everything, you can now root your Samsung Captivate I897:
  1. Download Odin3 v1.8.5 from the link above.  Save it to your computer.
  2. Download the auto root kernel to your computer. See the link above.
  3. Turn off your Samsung Captivate.
  4. Boot your Samsung Captivate into download mode. You can do this by holding down the Volume Down key while pressing the Power button.
  5. Run Odin3 on your computer.
  6. Click on the PDA button in Odin3 and navigate to where the I897UCKF1 auto root kernel is located.
  7. Choose the I897UCKF1 auto root kernel TAR file.
  8. In the Option section, make sure only Auto Reboot and F. Reset time are checked.  The other options should not be checked.
  9. Connect your phone to the computer via the USB Cable.
  10. If you’ve installed all the drivers correctly, you’ll see the ID:COM section in the upper left of the Odin3 window turn bright yellow.
    • If it does not turn yellow, disconnect your phone and install the appropriate device drivers. Try again.
  11. With the kernel in place, hit the START button. Odin3 will start flashing the kernel.
  12. Once the kernel has finished flashing, your phone will reboot.
  13. Wait for your phone to completely boot up before disconnecting it from the computer.
Your Samsung Captivate I897 is now rooted. Congratulations! You can now enjoy root access on your phone, as well as the possibility of flashing custom ROMs to your heart’s desire.
Copyright © 2012 Mirchu.Com All Right Reserved
Designed by CBTblogger